Windows Sound Recorder
Sound Recorder has
been included with Windows since its earliest days. It is not feature
rich by any stretch of the imagination—in fact, it enables you only to
record an audio file and save it to the hard drive on your computer.
Whereas the older version of Sound Recorder enabled you to record an
audio file, change the speed of the recorded playback, and do basic
editing and conversion of the saved output, this functionality is
missing with Windows 7. Sound Recorder can work with files that are in
the Windows Media Audio (.wma). format.
To start Sound
Recorder, click Start, All Programs, Accessories, Sound Recorder. This
gives you the Sound Recorder interface, shown in Figure 1

Really only one option
is available: Start Recording. Clicking this button enables you to
record audio using your PC’s microphone. When you have recorded all the
information you need, click the Stop Recording button (which appears
after a recording is started). When you stop recording, you get a Save
As dialog box asking you where to save the recorded output, as shown in Figure 2.

Here, you need to enter a
filename to save the file; you can optionally enter artist and album
information by clicking on the function links at the bottom of the Save
dialog and entering the desired data (see Figure 3).
If you enter the artist and album information, you can access this
information later inside Windows Media Player and the Documents library.

The file location defaults
to the Documents library, but you can change the location where the file
is saved by clicking the Documents icon in the sidebar (you might need
to click the Browse Folders button) and browsing to the library where
you want to save the file.
If you saved the
file in the default location, you can click Start, Documents and see the
file that you just recorded; if you specified the artist and album
information, it is displayed here as well (see Figure 4).

Volume Control
The Volume Control
accessory is basically a no-brainer. It provides a pop-up volume control
sporting balance, mute, and other controls for your audio subsystem.
Whether you’re playing radio stations from the Web, playing CDs from
your CD drive, listening to TV (if you have a TV tuner card), or
recording sound files, you need access to these controls from time to
time. Of course, if you don’t have a working sound card installed, this
accessory isn’t available—or, at least, it doesn’t do anything. A
little-known fact for many people is that this accessory has two sets of
controls—one for recording and one for playback.
1. | To
open the standard volume controls, simply click the little speaker icon
in the notification area on the Windows 7 taskbar (see Figure 5).

|
2. | You
can alter the system volume setting by dragging the volume slider up or
down. You can mute the output by clicking the picture of the speaker at
the bottom of the column. If you want to see another volume control,
you can select Mixer at the bottom of the column. Figure 6 shows the standard volume control.

Note The
Device slider links all the available sliders together and controls
both up and down directions for all sliders. The position of the Device
slider also represents the highest volume that any device can be set to.
This is important because each Application slider can be set to a
volume lower than the one set by the Device slider. Its somewhat
confusing described in words, so try it in practice to see it in action. |
|
3. | In
the Volume Mixer, you typically see two sliders, one for the audio
device and one in the Applications group for the system sounds. You
might see additional sliders for each running application. These sliders
are linked, so adjusting the speaker volume changes the volume level
for system sounds. Sometimes, though, you want the alert sounds to be
lower than other sounds coming out of your computer, so you can
independently control the sliders for each represented application. If
you happen to be watching a YouTube video with low audio, you don’t want
to be blown away by your New Email sound.
|
What do you do when adjusting the volume control from the notification area icon still doesn’t produce any sound? Various
goofs, settings, conflicts, and/or program malfunctions can cause a
loss of sound in your projects. As a result, troubleshooting your sound
system isn’t always easy. One tip is in order here: If you’re using a
laptop computer, ask yourself whether the sound stopped working after
you hibernated or suspended the system. This problem is common on
several laptops, and this bug might not have been worked out of Windows 7
for your sound chip set because some parts makers are still working
through their transition to Vista drivers. Try rebooting the computer,
and see whether the sound comes back to life. Another
thing to look for is a manual volume control on the computer. Many
laptops have a control that you can turn or push, often found along the
edge of the computer itself. For example, Toshiba has a hardware volume
controller on its laptops, and HP has a touch-sensitive slider pad that
needs special software to be installed. Such settings override any
settings within Windows. If you have a set of powered speakers attached
to your computer, make sure they are plugged in to power and are turned
on. |
|
If you are doing any
sound recording, be sure to view the recording controls, too. You can
access both the playback and recording level controls as described next.
Tip
To
quickly adjust or mute the sound output from your system, or to adjust
the master volume level (useful when the phone rings), click the little
speaker icon in the notification area, near the clock. |
The controls you see by
following these steps are a simplified version of the overall volume
settings. To access the detailed volume settings, choose Start, Control
Panel, look under Hardware and Sound in the default view and Sound if
you have changed to Icon view, Playback; double-click the Speakers entry
in the Sound window; and choose the Levels tab. Your sound system’s
capabilities and default settings determine the format of the volume
controls you see. On one of my computers, the controls look like what
you see in Figure 7.
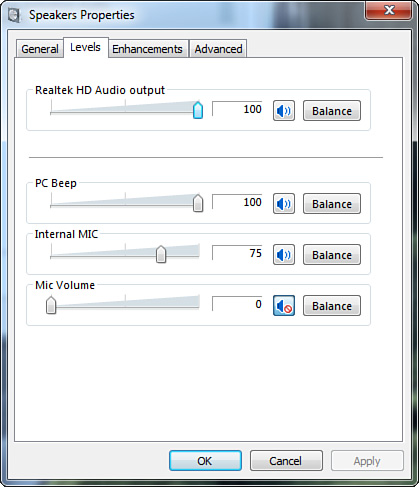
In this window, you
can manually adjust the individual levels of the output elements. You
can mute individual output elements by clicking the small speaker icon
to the right of the volume sliders.
If you are using a sound
card with support for more than two speakers, you can also run basic
diagnostics and choose the speaker configuration here by clicking the
Speakers item in the Playback window and clicking the Configure button.
More options are available to you, as well. Here they are, tab by tab:
Playback—
Use this tab to select the output device you are using. In the vast
majority of cases, you will have only one option. However, if you have
speakers that plug in and USB speakers, you can choose one of them.
Recording—
This tab works much like the Playback tab, but for recording devices.
Many podcasting microphones use USB to connect instead of the usual
input jack.
Sounds—
This is the standard Sounds tab that has been included in versions of
Windows since time immemorial. You can select from sound themes in the
Sound Scheme pull-down and modify which sounds do what and when in the
Program Events list. One new thing for Windows 7 is that there are
actual themes now—14 new ones plus two more for Ultimate users, to be
exact.
Communications—
In this new tab, you can actually tell Windows how to deal with the
volume if you happen to be using your computer for phone calls. The
default is set to decrease the volume by 80%.